/*****************************************************************
*Filename      : testwiringpi.c
*Description   : this program controls led flashing with wiringPi
*Author        : bihui gao
*Websit        : www.osoyoo.com
*Support E-mail: support@osoyoo.com
*Update        : 2017/06/23
******************************************************************/
#include <wiringPi.h>
#include <stdio.h>

#define LEDPIN  0

int main(){
//when initialize wiring failed,print message to screen
if(wiringPiSetup()== -1){
printf("Setup wiringPi Failed!");
return -1;

}
pinMode(LEDPIN,OUTPUT);
printf("\n");
printf("\n");
printf("********************************|\n");
printf("|       LED Blink               |\n");
printf("|  -----------------------      |\n");
printf("|                               |\n");
printf("|   LED connect to GPIO 0       |\n");
printf("|                               |\n");
printf("|   LED will blink at 500ms     |\n");
printf("|                         OSOYOO|\n");
printf("********************************|\n");
while(1){
digitalWrite(LEDPIN,LOW);
printf("...LED OFF\n");
printf("\n");
delay(500);
digitalWrite(LEDPIN,HIGH);
printf("LED ON...\n");
printf("\n");
delay(500);
}
return 0;
}
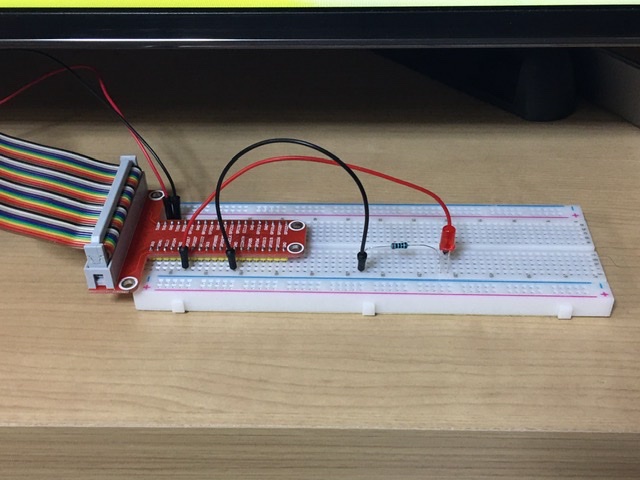
レッスン3はLED点滅。大成功! と言っても書いてある通りにやっただけだけど(^^;)
C で書いたプログラムをコンパイルして実行しただけ。C は勉強したことないがざっと見何となくわかる
現在のプログラム言語って何が主流なのだろうねぇ・・時代とともに変わるけど・・・
パソコンにputty(リモートログオンクライアント)をインスト、ラズパイはsshの設定でパソコンでリモートアクセス
上の動画はパソコンモニター
今回使ったコマンド
pi@raspberrypi:~ $ gpio -v
gpio version: 2.52
Copyright (c) 2012-2018 Gordon Henderson
This is free software with ABSOLUTELY NO WARRANTY.
For details type: gpio -warranty

Raspberry Pi Details:
  Type: Pi 4B, Revision: 01, Memory: 4096MB, Maker: Sony
  * Device tree is enabled.
  *--> Raspberry Pi 4 Model B Rev 1.1
  * This Raspberry Pi supports user-level GPIO access
pi@raspberrypi:~ $ sudo apt-get update
ヒット:1 http://archive.raspberrypi.org/debian buster InRelease
取得:2 http://raspbian.raspberrypi.org/raspbian buster InRelease [15.0 kB]
取得:3 http://raspbian.raspberrypi.org/raspbian buster/main armhf Packages [13.0 MB]
13.0 MB を 25秒 で取得しました (511 kB/s)
パッケージリストを読み込んでいます... 完了
pi@raspberrypi:~ $ sudo apt-get upgrade
パッケージリストを読み込んでいます... 完了
依存関係ツリーを作成しています
状態情報を読み取っています... 完了
アップグレードパッケージを検出しています... 完了
アップグレード: 0 個、新規インストール: 0 個、削除: 0 個、保留: 0 個。
pi@raspberrypi:~ $ sudo apt-get install git-core
パッケージリストを読み込んでいます... 完了
依存関係ツリーを作成しています
状態情報を読み取っています... 完了
注意、'git-core' の代わりに 'git' を選択します
git はすでに最新バージョン (1:2.20.1-2+deb10u1) です。
アップグレード: 0 個、新規インストール: 0 個、削除: 0 個、保留: 0 個。
pi@raspberrypi:~ $ git clone git://git.drogon.net/wiringPi
Cloning into 'wiringPi'...
fatal: unable to connect to git.drogon.net:
git.drogon.net[0: 2a03:9800:10:7b::2]: errno=接続を拒否されました
git.drogon.net[1: 188.246.205.22]: errno=接続を拒否されました
pi@raspberrypi:~ $ sudo nano testwiringpi.c
GNU nano 3.2                     testwiringpi.c
/*****************************************************************
*Filename      : testwiringpi.c
*Description   : this program controls led flashing with wiringPi
*Author        : bihui gao
*Websit        : www.osoyoo.com
*Support E-mail: support@osoyoo.com
*Update        : 2017/06/23
******************************************************************/
#include <wiringPi.h>
#include <stdio.h>

#define LEDPIN  0

int main(){
//when initialize wiring failed,print message to screen
if(wiringPiSetup()== -1){
printf("Setup wiringPi Failed!");
return -1;
}
[ 45 行を読み込みます ]
^G ヘルプ    ^O 書き込み  ^W 検索      ^K 切り取り  ^J 均等割付  ^C カーソル位置
^X 終了      ^R 読み込み  ^\ 置換      ^U 貼り付け  ^T スペル確認^_ 行を指定
pi@raspberrypi:~ $ gpio readall
+-----+-----+---------+------+---+---Pi 4B--+---+------+---------+-----+-----+
| BCM | wPi |   Name  | Mode | V | Physical | V | Mode | Name    | wPi | BCM |
+-----+-----+---------+------+---+----++----+---+------+---------+-----+-----+
|     |     |    3.3v |      |   |  1 || 2  |   |      | 5v      |     |     |
|   2 |   8 |   SDA.1 |   IN | 1 |  3 || 4  |   |      | 5v      |     |     |
|   3 |   9 |   SCL.1 |   IN | 1 |  5 || 6  |   |      | 0v      |     |     |
|   4 |   7 | GPIO. 7 |   IN | 1 |  7 || 8  | 1 | IN   | TxD     | 15  | 14  |
|     |     |      0v |      |   |  9 || 10 | 1 | IN   | RxD     | 16  | 15  |
|  17 |   0 | GPIO. 0 |  OUT | 1 | 11 || 12 | 0 | IN   | GPIO. 1 | 1   | 18  |
|  27 |   2 | GPIO. 2 |   IN | 0 | 13 || 14 |   |      | 0v      |     |     |
|  22 |   3 | GPIO. 3 |   IN | 0 | 15 || 16 | 0 | IN   | GPIO. 4 | 4   | 23  |
|     |     |    3.3v |      |   | 17 || 18 | 0 | IN   | GPIO. 5 | 5   | 24  |
|  10 |  12 |    MOSI |   IN | 0 | 19 || 20 |   |      | 0v      |     |     |
|   9 |  13 |    MISO |   IN | 0 | 21 || 22 | 0 | IN   | GPIO. 6 | 6   | 25  |
|  11 |  14 |    SCLK |   IN | 0 | 23 || 24 | 1 | IN   | CE0     | 10  | 8   |
|     |     |      0v |      |   | 25 || 26 | 1 | IN   | CE1     | 11  | 7   |
|   0 |  30 |   SDA.0 |   IN | 1 | 27 || 28 | 1 | IN   | SCL.0   | 31  | 1   |
|   5 |  21 | GPIO.21 |   IN | 1 | 29 || 30 |   |      | 0v      |     |     |
|   6 |  22 | GPIO.22 |   IN | 1 | 31 || 32 | 0 | IN   | GPIO.26 | 26  | 12  |
|  13 |  23 | GPIO.23 |   IN | 0 | 33 || 34 |   |      | 0v      |     |     |
|  19 |  24 | GPIO.24 |   IN | 0 | 35 || 36 | 0 | IN   | GPIO.27 | 27  | 16  |
|  26 |  25 | GPIO.25 |   IN | 0 | 37 || 38 | 0 | IN   | GPIO.28 | 28  | 20  |
|     |     |      0v |      |   | 39 || 40 | 0 | IN   | GPIO.29 | 29  | 21  |
+-----+-----+---------+------+---+----++----+---+------+---------+-----+-----+
| BCM | wPi |   Name  | Mode | V | Physical | V | Mode | Name    | wPi | BCM |
+-----+-----+---------+------+---+---Pi 4B--+---+------+---------+-----+-----+
– BCM : GPIO番号
– wPi : Wiring Pi番号
– Name : 端子名称
– Mode : 入力か出力か
– V : 現在の端子にかかってる電圧状態
– Physical : 物理端子番号
pi@raspberrypi:~ $ wget http://osoyoo.com/driver/pi3_start_learning_kit_lesson_3/testwiringpi.c
--2019-12-28 16:13:30--  http://osoyoo.com/driver/pi3_start_learning_kit_lesson_3/testwiringpi.c
osoyoo.com (osoyoo.com) をDNSに問いあわせています... 51.79.21.80
osoyoo.com (osoyoo.com)|51.79.21.80|:80 に接続しています... 接続しました。
HTTP による接続要求を送信しました、応答を待っています... 200 OK
長さ: 1363 (1.3K) [text/x-csrc]
`testwiringpi.c.1' に保存中

testwiringpi.c.1    100%[===================>]   1.33K  --.-KB/s 時間 0s
2019-12-28 16:13:30 (4.31 MB/s) - `testwiringpi.c.1' へ保存完了 [1363/1363]
pi@raspberrypi:~ $ gcc -Wall -o app testwiringpi.c -lwiringPi
pi@raspberrypi:~ $
pi@raspberrypi:~ $ sudo ./app
********************************|
|       LED Blink               |
|  -----------------------      |
|                               |
|   LED connect to GPIO 0       |
|                               |
|   LED will blink at 500ms     |
|                         OSOYOO|
********************************|
...LED OFF
LED ON...

...LED OFF

LED ON...

...LED OFF

LED ON...

^C      (強制終了)


さて、次いってみよーーーーぉ!
覚え書き
Explanation: C language is high level language. Before running the project, the code need to compile as an executable file.
gcc: is GNU Compiler Collection. If you want to write your own C code and compile to run it, you need to master gcc.
-Wall: to get more error when compile the code
-o: to name the compiled file. You can name the file as your like. here we name as app
testwiringpi.c: means the original file which is compiled
-lwiringPi: is to load the library wiringPi (l is short for library)